After installing WordPress successfully for your website, the first thing you should learn is how to install WordPress themes. Similar to plugin installation, WordPress themes can be installed from the
In this tutorial, I will show you all the steps on installing WordPress themes using both Dashboard and FTP methods.
Things You Should Know
By the end of this guide, you’ll know how to install WordPress themes within minutes.
But keep in mind that after installing and activating a new theme, it will change total design and functions for your entire website including both front-end and back-end.
If you are switching from an existing theme, make sure you take a complete backup before
Also, if your blog or website is hosted on WordPress.com, I’m sorry but you cannot install a theme there. You can only add your custom theme on a
Keep reading to learn how to install WordPress themes on a self-hosted website.
So, How to Install WordPress Themes?
Technically, there are only three ways to install WordPress themes:
- Using “Search and Install” Feature
- Install WordPress Themes from ZIP
- Install WordPress Themes Manually using FTP
The first method is very simple and easy. Using the search feature, you can install free WordPress themes. The second method is mostly used to install premium WordPress themes.
And the third method is used when you cannot install your theme using any of the two methods, and is mostly used by professionals.
Keep reading to learn how to install WordPress themes on a self-hosted website using the above methods.
Installing WordPress Theme using Search Feature
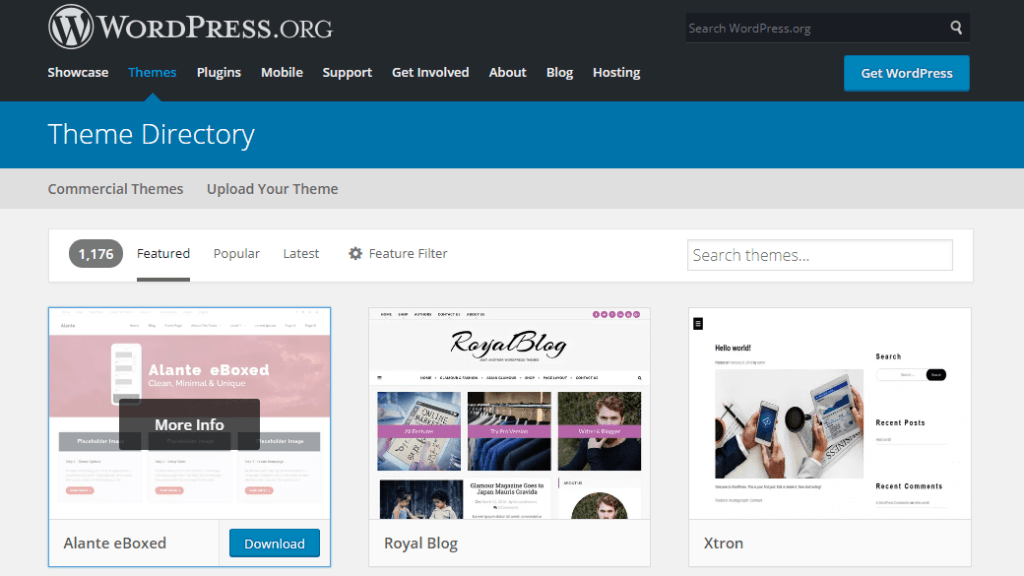
If you are looking for a Free WordPress theme for your site, WordPress.org offers a themes directory that includes over six thousand themes ready to install instantly.
You can directly search and install any of those themes using WordPress admin theme search functionality.
Click on “Appearance >> Themes” from your Admin dashboard navigation menu. If you have any installed themes on your website, you will see them here.
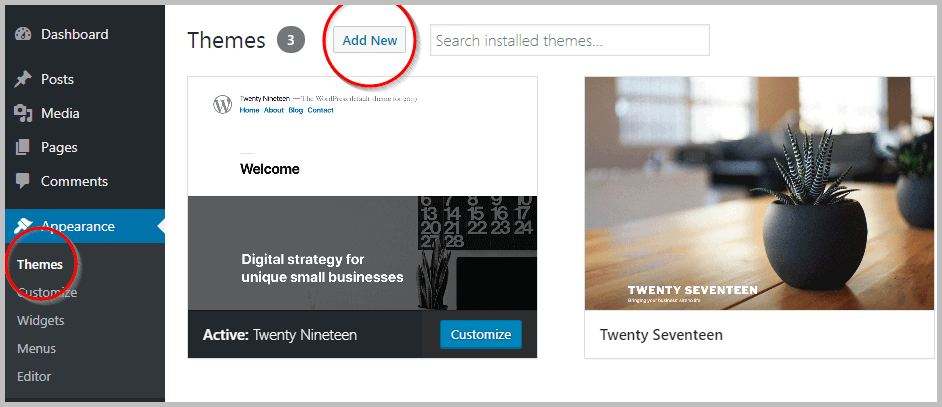
Now click on the “Add New” button at the top of the page.
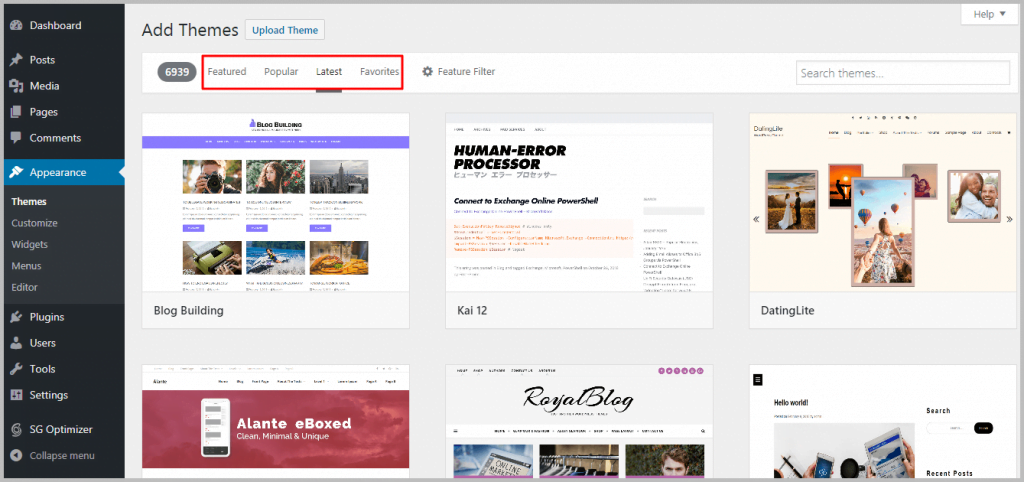
On the next page, you will see a list of fifteen featured themes among over 6.9 thousand themes hosted on the WordPress directory.
Click on the “Popular” tab from the top menu and you will get a list of themes sorted by popularity. The “Latest” tab will show you all the themes sorted by date published.
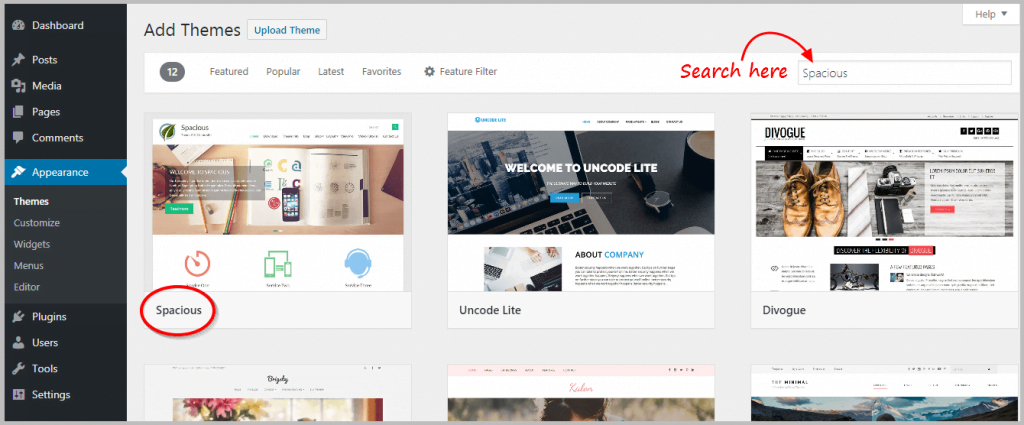
If you know the name of your theme, you can simply search for it. Enter your search type keyword in the “search-box”. You will see a list of themes matched and/or related to your search term.
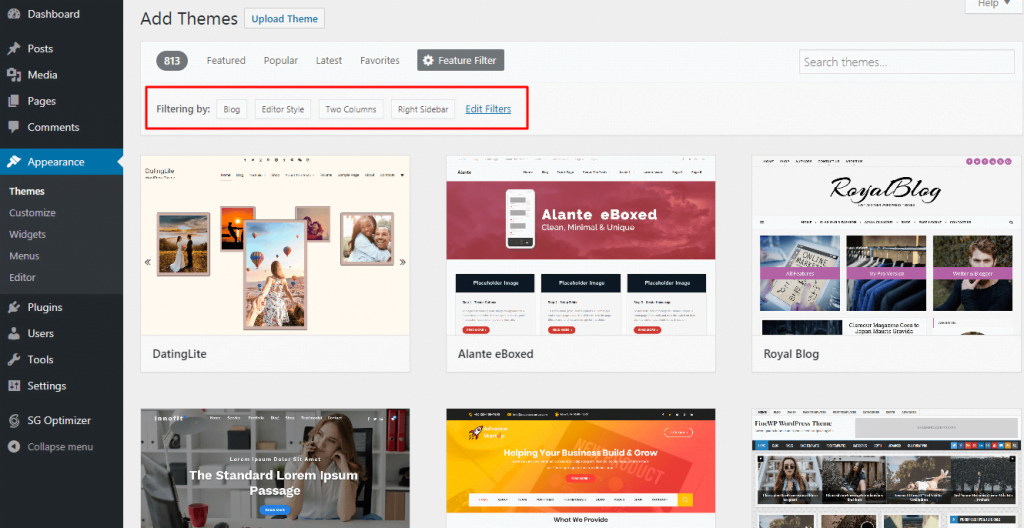
Each theme in the WordPress official directory comes with related Tags describing its functionality. You can use those tags to search for the right theme for your website using the “Feature Filter” option. Click on it.
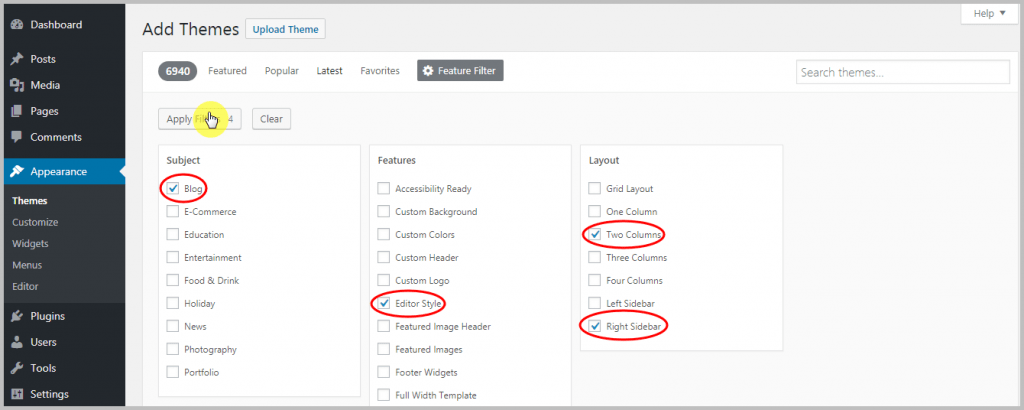
For example, you may want a blog theme with Editor Style and Two Columns layout including the right sidebar.
Then select Blog from the “Subject” column, Editor Style from “Features” Columns, and Two Columns plus Right sidebar from “Layout” column.
Click on “Apply Filter”. WordPress will now show you all the themes that include your selected features.
Hover your mouse to any of those themes and you will see two options – Install & Preview. If you want to see the details and preview of that theme, you can click on the
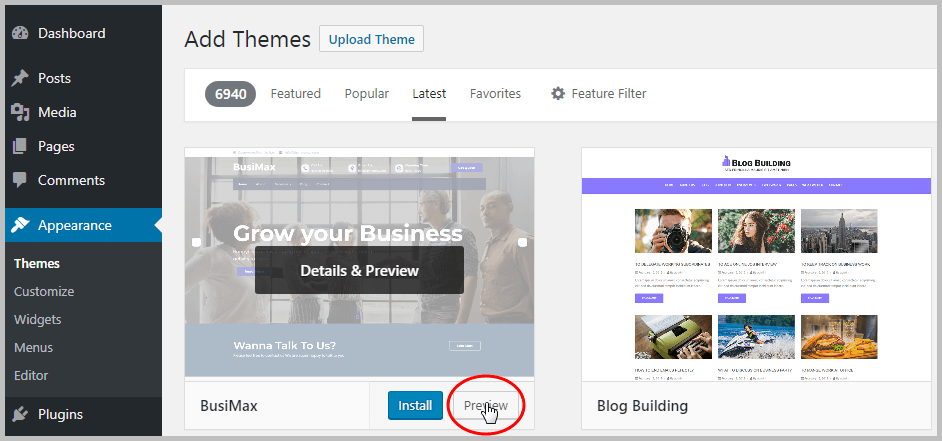
Note that, your selected theme might not be looked perfect as it shows in the preview image because every theme has its own configuration and you’ll only get the perfect demo after configuring its settings on theme options.
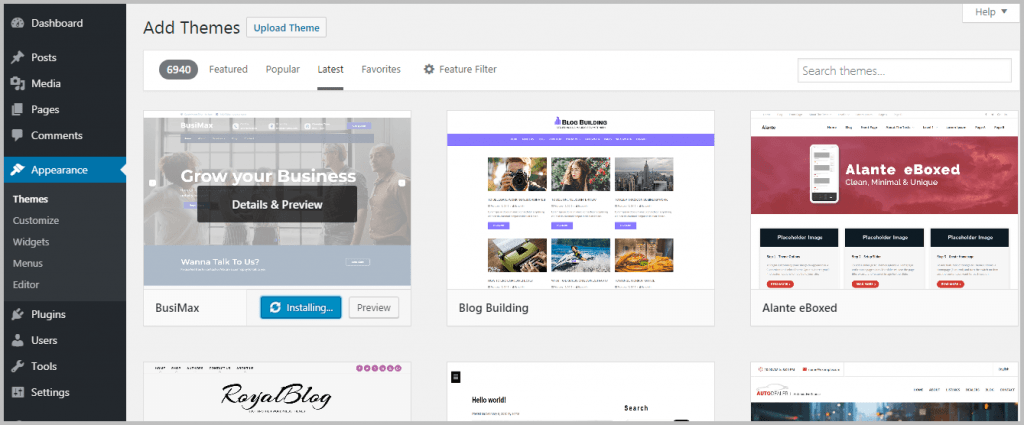
Now if you’re happy with the theme’s features and ready to install it for your website, click on the ‘Install‘ button.
WordPress will now download the theme files to your hosting server and install the theme for you.
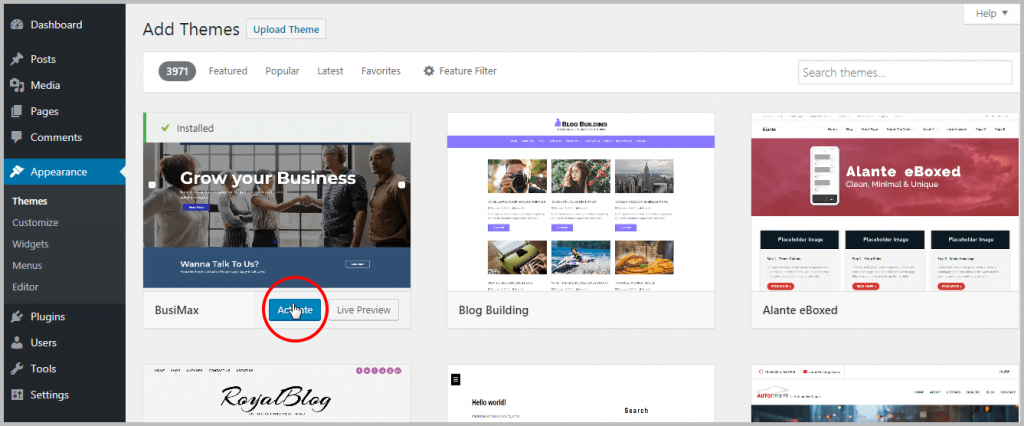
Now, simply click on the ‘Activate‘ button on the same page to activate the theme. That’s all. You have successfully installed a theme for your WordPress site.
How to Install WordPress Themes from ZIP
Using the above method, you can only search and install free themes hosted on WordPress.org.
However, what if you have purchased a theme from any marketplace like themeforest or developed a custom theme for your site? Well, that’s why WordPress offers the Upload a theme feature.
Installing WordPress themes from a ZIP file is a quick and easy process that allows you to use custom themes for your website. Here’s a step-by-step guide on how to install WordPress themes from zip:
Download the ZIP file:
I assume that you have already downloaded the ZIP file of your theme from the theme provider. In my case, I’m downloading a theme for the WordPress.org theme directory and will try installing it. The file was downloaded in
Upload the theme ZIP file:
Now, navigate to Appearance > Themes and click on Add New button at the top of the page. On the next screen, click on the Upload Theme button.
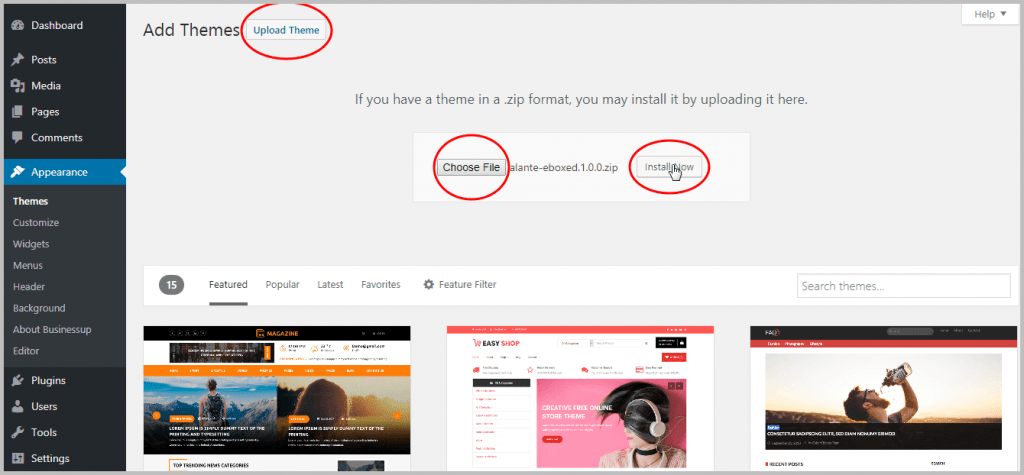
Here you can drag and drop your theme’s zip file or click on the ‘choose file’ button to select the theme from your computer drive. After you have selected the file, click on the ‘Install Now’ button to install the theme.
Activate the theme:
WordPress will now upload the theme on your server and install it for you. Once done, you will see an installation successful message like this:
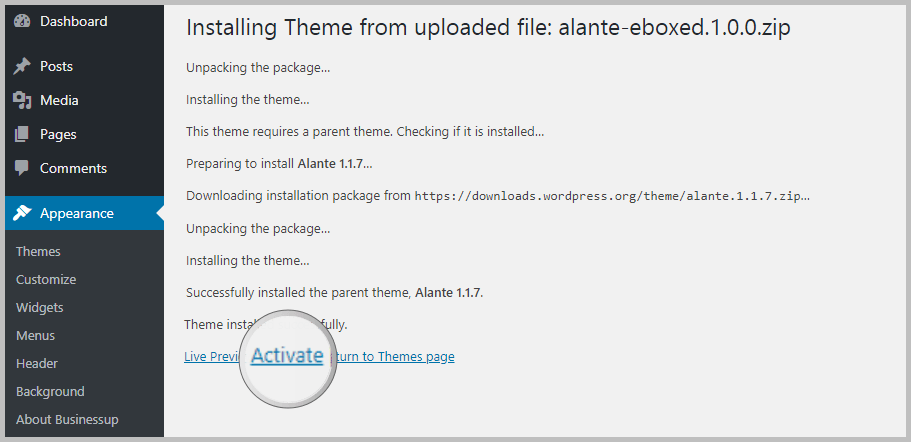
Click on the “Activate” button to activate your theme instantly. That’s all. You have successfully installed and activated your new theme for your WordPress site.
Congratulations, you’ve successfully installed a WordPress theme from a ZIP file!
How to Install WordPress Themes Manually using FTP
Installing WordPress themes manually is also a straightforward process that requires you to upload the theme files to your server via FTP. Here’s a step-by-step guide on how to install wordpress themes manually:
This method is useful if for any reason you don’t want to use any of the above methods or want to try the advanced way to install a WordPress theme for your site.
Download the ZIP file:
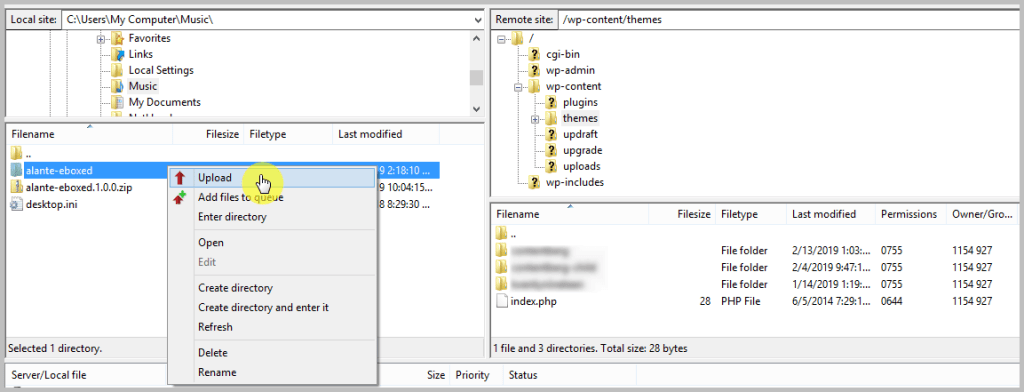
Download your theme from its source and extract (unzip) to a new folder. You will need to upload this entire folder to your website using an FTP Manager.
Read this tutorial to learn how to use FTP to upload files to WordPress with step by step guideline.
Upload the theme ZIP file using FTP:
Now that you have learned how to connect FTP client to your hosting, upload the theme folder on /wp-content/themes/ directory of your hosting.
Activate the theme:
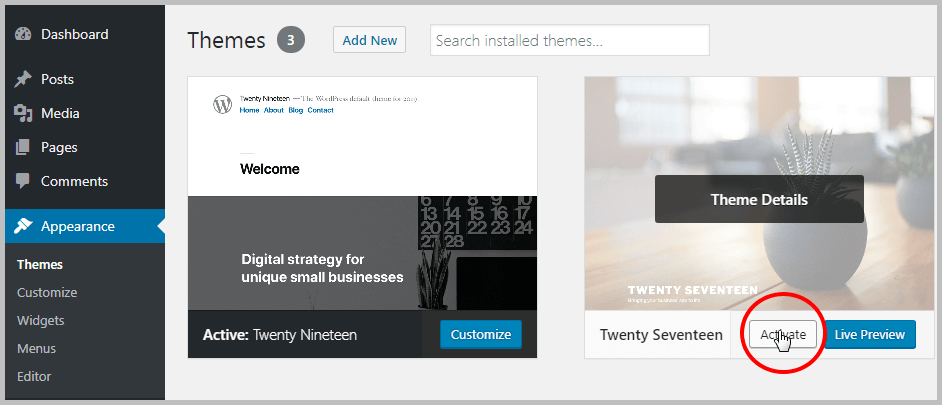
You are done with the FTP part. Now login to your Admin Panel and navigate to “Appearance > Themes”. You will see your newly uploaded theme listed there. Hover your mouse on it and click on the “Activate” button.
Congratulations, you’ve successfully learned how to install wordpress theme manually!
Things to do After Installing WordPress Themes
After successfully installing a WordPress theme for your site, you shall now customize the theme to change the front-end look for your visitors and make it like the demo.
Depending on your theme, it may offer additional settings options like ‘Theme options” where you can configure headers, footer, sidebars and/or homepage.
You can also customize your site from the WordPress default Customize feature.
Click on Appearance > Customize from your admin area or visit yourdomain.com/wp-admin/customize.php.

That’s all!
So, what’s the best way to Install WordPress Themes?
Among all those options to install WordPress themes, I personally use the Search and Install feature to install available free themes from the WordPress theme directory.
Also, I use the ‘Upload Theme’ option to install paid themes from third-party sources.
Now I’d like to hear from you…
I tried to make the tutorial simple and cover all the steps to help you
You may also visit our Theme category to find more tutorials on WordPress themes and customization to extend your WordPress functionality.
If you liked this how to install WordPress themes guide feel free to share it with your friends and fellows.
If I missed any step, let me know by leaving a comment below right now.

2 Comments
Can I upload new plugins (bought one from themeforest) to my wordpress site using FTP following the same method?
Hi William, thanks for your comment. Yes, surely you can. Just make sure you upload your plugin folder/files to /wp-content/plugins/ directory.